


The Welcome screen lists the database version and the technology stack components that are installed with the E-Business Suite.

Use the Select Wizard Operation screen to indicate the action you want Rapid Install
to perform.

Install Oracle Applications E-Business 11i-
This action sets up a new, fully configured system, with either a fresh database or a Vision Demo database. The configuration is derived from the system-specific configuration parameters you enter in the Rapid Install wizard and save in the configuration file (config.txt).
Express Configuration-
This action sets up a fully configured, single-user/single-node system with either a fresh database or Vision Demo database. You supply a few basic parameters, such as database type and name, top-level install directory, and increments for port settings. The remaining directories and mount points are supplied by Rapid Install using default values.
Upgrade to Oracle Applications E-Business 11i-
Choose this option to indicate that you are upgrading your E-Business Suite products to the current version of Oracle Applications. The wizard screen flow presents two paths: one that lays down the file system and installs the new technology stack, and one that configures servers and starts services.
3. Identify configuration file
On the Load Configuration screen, you indicate whether you will be using an existing configuration file.

-

If you choose "Yes, load configuration file," the directory path field becomes active.
Because this is a new installation, click No, and click Next to continue.
4. Choose installation type
On the Install Type screen, you indicate whether you want to install servers on a single node or distribute them across multiple nodes.

To set up a single-node system, click Single-node.
5. Define database type
On the Database Type screen, indicate the kind of database you want to install in the new system and supply the name you will use to identify it.
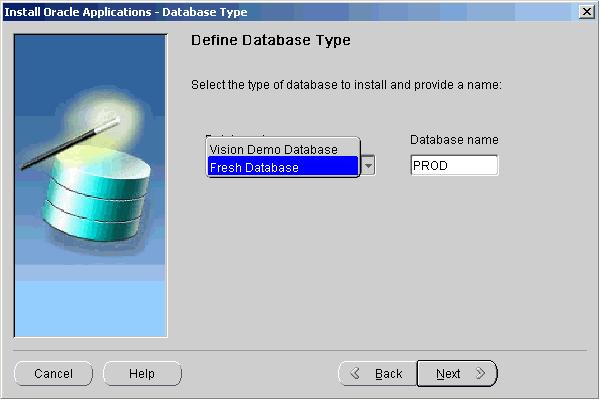
- A fresh database is fully configured and ready for a new implementation.
- A Vision Demo database is used for demonstration or training purposes.
6. Set up database installation directory
The Database Install Information screen prompts you for information Rapid Install needs to set up and install the database.

On a UNIX (or Linux) operating system, the screen would look like this.


7. Select product license type
On the Suite Selection screen, the wizard prompts you to indicate the type of licensing agreement you have purchased from Oracle Applications.


-Some systems require the country-specific functionality of a localized Applications product.
-If your company operates only in the US, you can bypass this screen


American English is installed in your system by default

The NLS language and territory settings are stored as profile options in the database.

You have already specified the top-level directory and the mount points for the RDBMS. Now you must specify top-level directory and subdirectories associated with the application tier servers.


12. Review global settings
Rapid Install uses the values specified on the Global Settings screen to identify a qualified domain name and to derive port settings that your system will use to connect services and listeners.

The starting number of the port value is preset, but you can customize it by selecting an incremental number from the drop-down list in the Port Pool field. There are 100 port pool selections.


13. Save the configuration file
You have now completed all the information Rapid Install needs to set up and install a single-node system. The Save Instance-specific Configuration screen asks you to save the values you have entered in the wizard in a configuration file

The default location of the config.txt file is the system temporary directory. It’s a good idea to choose a permanent directory location because you may use this file at a later date.

14. Review pre-install checks
On the Pre-Install Checks screen it lists the tests performed and marks each one with an indication of whether it succeeded or failed.

15. Begin the installation
On the Component Installation Review screen, Rapid Install lists the components it will install, based on the system parameters you entered in the wizard.

Monitor Installation Progress:
1. Check progress bars
The main progress bar reports on the completion percentage of the installation as a whole.

However, you may receive a
prompt requesting information if any of the components are missing from the stage directory.


